"Candy Vinyl Wrap Application Guide: Transform Your Vehicle with Style"
If you're looking to give your vehicle a fresh, eye-catching look, candy vinyl wraps are an excellent option. Known for their vibrant, glossy finish and rich, deep colors, candy vinyl wraps can make any car or surface stand out. Whether you're a DIY enthusiast or considering professional installation, this guide will walk you through the basics of applying Candy Vinyl Wrap and achieving a stunning result.
What is Candy Vinyl Wrap?
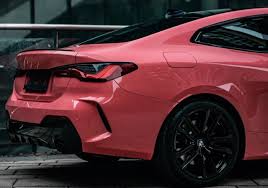
Candy vinyl wraps are high-quality adhesive films with a translucent, glossy finish that mimics the look of candy paint. They allow the underlying surface or base color to shine through, creating a unique depth and shine. These wraps are popular for cars, motorcycles, and even household items, offering a cost-effective way to customize your belongings without the permanence of paint.
Tools You'll Need
Before you start, gather the essential tools for a smooth application process:
- A heat gun or hairdryer
- Squeegee with felt edge
- Precision knife or cutting blade
- Cleaning solution (alcohol-based)
- Microfiber cloth
- Measuring tape
Step-by-Step Application Process
1. "Prepare the Surface"
Begin by thoroughly cleaning the surface you'll be wrapping. Use an alcohol-based cleaning solution to remove dirt, grease, and debris. A clean surface ensures better adhesion and a flawless finish.
2. "Measure and Cut the Vinyl"
Measure the area you want to wrap and cut the vinyl to size, leaving extra material around the edges for adjustments. This excess will help you achieve a snug fit and avoid accidental gaps.
3. "Position the Vinyl"
Peel off the backing paper to expose the adhesive side of the vinyl. Carefully position it over the surface, ensuring it aligns properly. For larger sections, enlist a friend's help to avoid wrinkles or bubbles.
4. "Apply Heat and Smooth Out"
Use a heat gun or hairdryer to warm the vinyl as you press it onto the surface. The heat makes the material more pliable and easier to mold around curves and edges. Use a squeegee to smooth out air bubbles and wrinkles as you go.
5. "Trim Excess Material"
Once the vinyl is securely in place, use a precision knife to trim off any excess material along the edges. Be careful not to cut too close to avoid damaging the surface underneath.
6. "Finish with Heat"
Go over the entire wrapped area with heat one more time to ensure proper adhesion. This step also helps seal the edges and enhances the glossy finish.
Tips for Success
- Work in a clean, dust-free environment to prevent particles from getting trapped under the vinyl.
- Take your time with curves and edges, as these areas require extra attention.
- Practice on smaller surfaces if you're new to vinyl wrapping.
Why Choose Candy Vinyl Wraps?
Candy vinyl wraps are not only visually stunning but also practical. They protect your vehicle's original paint from scratches and UV damage while being easy to remove when it's time for a change. Additionally, they're more affordable than custom paint jobs and allow for endless customization options.(Red Car Wrap)
Shop Candy Vinyl Wraps Online
Ready to get started? Browse our online sale for high-quality candy vinyl wraps in a variety of colors and finishes. With the right tools and this guide, you'll be well on your way to transforming your vehicle or project into a masterpiece.
Unleash your creativity and let candy vinyl wraps take your customization game to the next level!
 Navigate